| Applied
Neuroscience
142 Gloucester Place London, NW1 6DT, U.K Tel. +44 (0) 207 7231202 Fax. +44 (0) 207 7233013 |
|
| Applied
Neuroscience
142 Gloucester Place London, NW1 6DT, U.K Tel. +44 (0) 207 7231202 Fax. +44 (0) 207 7233013 |
|
Applied Neuroscience microdialysis electrodes/probes are prepared with the utmost care, and their design benefits from years of experience in this field. Please read and follow carefully the instructions below. They will help you to obtain reliable data from each experiment. Any comment on these instructions will be appreciated.
1. Unpacking of individual electrode/probe
1.1. DO NOT remove the probes/electrodes from the packaging paste by pulling on tubing or connecting pin.
1.2. Using forceps with striated tips (Fig. 1), firmly grab the stainless steel body and pull out slowly. This operation is easier if you first push away gently the packaging paste on both side of the stainless steel tube. We have selected the best forceps (see Accessories, part No FO-2) for this operation and line connections (see 4.).

2.2. Before being used, the perfusion medium should be degassed by warming it to 38-40oC, and keeping at this temperature for at least 15 min. This is strictly required if the medium was stored in the cold. Degassing reduces the risk of small bubbles forming spontaneously as the medium flows through the implanted probe. Once formed, bubbles may remain stacked against the dialysis membrane and alter its recovery/delivery.
2.3. If your medium was frozen, check that some of the salts have not precipitated. These may block the fine fused silica tubing of the probe. They also imply that the composition of your medium has been altered.
2.4. Sterilize the perfusion medium by filtering it through a disposable micropore membrane (0.2 ì), and store it in separate, small containers. Contamination with bacteria or algae is likely to modify the composition of the dialysate samples (e.g. synthesis of glutamate from glutamine).
2.5. To fill the probe, use a disposable 1 ml syringe, firmly fitted with a short hypodermic needle (Microlance 30G½ 0.3x13, Beckton Dickinson, Fraga, Espana), and filled with around 0.3 ml of perfusion medium. Eliminate all bubbles from the syringe and needle. By handling the probe by the end of its inlet tube (i.e. the long one), carefully connect this tube to the syringe by pushing in 3 to 5 mm of the needle tip (mind your fingers !). From now on, hold the assembly probe-needle-syringe by the syringe, except when stated otherwise.
Hold in one hand the body of the syringe, with the syringe and probe directed upward. Push the piston of the syringe very slowly with your other hand. You should see clearly the perfusion medium/air interface move along the inlet tube, then disappear within the probe, to shortly reappear at the outlet.
Once the probe is filled to the end of the outlet tube, firmly hold the needle of the syringe with one hand, and push reasonably hard on the piston with the other hand for 1-2 sec. This is to ensure that there is no bubble trapped in the microdialysis tip. Release the pressure and push again. Repeat this type of pumping operation up to five times. Examine the tip of the probe with a stereomicroscope; no bubble should remain (a very small bubble at the very tip is occasionally impossible to dislodge and is acceptable). If necessary, alternate a gentle suction by pulling on the piston (but without bringing air from the outlet back into the probe), immediately followed by a firm push.
During this operation, it is normal to see the perfusion medium perspire through the membrane. This is not a leak but a normal property of the Hospal membrane. Since our probes are thoroughly tested, a leak is highly improbable, unless the tip of the probe has been mechanically damaged.
3.2. We strongly recommend the use of an operating stereomicroscope for implantation of the probe. A stereomicroscope is also useful to check the probe and its filling by close examination (see 2.5.), and to connect it to the pump and sample-collector (see 4.).
Further details on microdialysis probe implantation
are available on request.
mail@appliedneuroscience.co.uk
4.2. For connection of the microdialysis probe inlet to syringes or liquid switch, we recommend to use ~10 mm sections of peristaltic tubing from Anachem (Luton, UK; Part No 1160549040), with its internal diameter previously expanded by inserting a 1 mm male pin connector, and letting it in place for > 10 min.
4.3. Under the microscope, cut the inlet tube right above the level of the electrode (ME-Hx) or 5-10 mm above the inlet tube base (M0-Hx). We recommend the use of a flat spatula, or the flat back end of forceps, and a NEW straight scalpel blade. Position the spatula against the tube, and press the scalpel blade on the tube at the cutting point. Cutting at a slight angle (i.e. around 30o) facilitates connection. Repeat this operation to cut the outlet around 5 mm from its base.
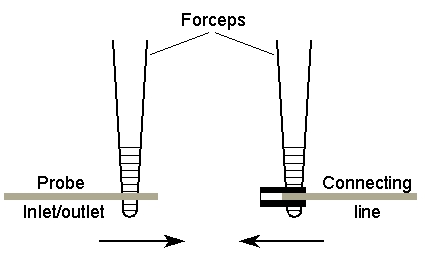
4.4. Under the microscope, firmly hold the cut inlet or outlet tube in the straight forceps (Figure 2), with the tube perpendicular to the forceps (i.e. the tube is firmly along the lines of the forceps tip; this avoid crushing the tubing), and around 2 mm of tubing emerging from the forceps tip. With another pair of forceps, firmly hold the connecting line by its silicon sleeve, and insert the probe inlet/outlet into the silicon sleeve. Slightly shift the forceps holding the inlet/outlet away from the sleeve, hold firm again and insert the inlet/outlet further. Repeat this operation until the tip of the inlet/outlet is right against the connecting line.
| With practice, the whole procedure can be performed within 30-45 min. |